Category Archives: cooks

Preserving the Last Life of Summer

It’s the second day of fall and I have a lot to do but instead I have decided to harvest the arugula which I let grow weedy between the bricks in the backyard. I sit in the bright noon sun, plucking leaf after leaf into a large bowl. The arugula is leggy and the honeybees still cling to the yellow flowers even after the stalks are cut and in my hand. The leaves are going to become arugula pesto, made with walnuts and my pungent parmesan smuggled from Europe.

First Harvest
(a much older photo of my wild arugula – 4 years ago)

Our black cherry tomato plant has gone wild, sending branches like tentacles all over the garden. I keep finding bunches of green tomatoes under tables and in other plants. It’s too late, they will never ripen quite like their summer brothers, so I’m pickling them green. Sometime this winter I’ll have a dirty martini or a bloody mary with a pickled tomato garnish and remember the summer.

Freezer and Pantry Inventory

You probably got the hint that I’m a bit of a geek and a planner from my Vacation Planning with Google Maps entry, so maybe you won’t be surprised when I tell you that I keep a freezer / pantry inventory in a Google Spreadsheet.

Does this makes me sound like a hyper-organized superwoman? I’m really not that organized. Really. But if you too have a chest freezer, you’ll know that it has the potential to be a deep dark pit into which all these wonderful edible things disappear indefinitely. And then you end up thinking “I could really go for some chili right now” as you flip open the freezer, but as soon as you see the 3-foot high pile of unidentified food items, your back starts to hurt, you sigh, and you order takeout.

Chest Freezer

Taking a freezer /pantry inventory not only prevents you from buying something you already have, but it’s also a good way to stay inspired by new recipes and combinations. My spreadsheet has a Freezer sheet, a Pantry sheet, and a Meal Ideas sheet. When I can see it all at one glance, I get inspired – like maybe I should make a lamb roast with some of that butternut squash gnocchi and creamed spinach. It’s all in my freezer!

Before I got high-tech with this endeavor, I used to keep a piece of paper on the freezer and I’d cross off items as I removed them. But I like using a Google Doc because I can reference it on my phone in the grocery store or on a hungry bus ride home.

Freezer Inventory

My favorite time to inventory my freezer is on a hot day when it’s a treat to stick my head in a very cold place. I quickly take everything out and put it in a bin, then jot down each item as I return it to the freezer (I type out the list later – I’d rather not risk getting my laptop wet). The other freezer commandment? Remember to label everything!

Do you have a chest freezer? Do you keep track of its contents?

Middle Eastern Feast

I’ve made all of the components of this meal separately, but this weekend I thought I’d put them all together to make a fun, informal meal for guests. This is a low-stress dinner party because almost everything can be made ahead and you can supplement with store-bought extras like pita bread, olives, and a tasty feta (try the Hungarian feta from the deli case at Sonia’s). For dessert, pick up some good dates – or if you are lucky like us, one of your guests will bring a delicious olive oil cake.

Bonus: this makes for great leftovers. I have to admit that the photo below is actually the leftovers, which we ate tonight with a couple of friends!

Middle Eastern Feast

Here are links to the recipes I used (or similar ones, because some of these live in my head):

If you’re in the Providence area, we picked up most of our ingredients at these two stores:

Slice it Up: Zucchini Tart

A few years ago, when we first joined a CSA, we were swimming in zucchini. Taking my inspiration from vegetable quiches I had been making earlier in the season, I topped a savory custard with thinly sliced zucchini and yellow squash.

Another Zucchini Tart shot

The result was a hit – it kept well in the fridge, tasted good warm or at room temperature, and was perfect for picnics and polo matches.

Zucchini Tart

Here’s my basic recipe. I’m sure you can imagine many variations. I just use what’s in the fridge – I’ve tried it with many cheeses, herbs, etc. and it’s very adaptable.

Recipe: Zucchini Tart

Ingredients

  • your favorite savory crust recipe (I usually use Martha Stewart’s pate brisee – but there’s always Jiffy in a box)
  • 2 medium zucchini
  • 2 eggs
  • 3/4 cup gruyere or similar cheese, shredded
  • 1 c. cream or milk
  • 1 clove garlic, chopped
  • 1 tsp. chopped tarragon
  • Salt and white pepper

Instructions

  1. In a springform tart pan, prepare crust and pre-bake as directed. Set aside to cool.
  2. Preheat the oven to 375.
  3. Cut the round end off the zucchini and slice 1/8 in. thick – much easier with a mandoline!
  4. In a medium bowl, whisk eggs with a fork. Whisk in milk.
  5. Season the egg mixture with some salt, white pepper, garlic, and tarragon.
  6. Sprinkle the grated cheese over the crust.
  7. Gently pour the egg mixture over the cheese into the crust.
  8. Now the fun part: starting around the egde, lay down the zucchini slices one by one, overlapping the edges. Instead of trying to spiral the slices, I find it easier to start with one big circle, then make a smaller circle inside it, and so on. It may look messy at first, but don’t worry, it’ll be fine in the end!
  9. Bake at 375 for 30 minutes or until set. Wiggle it or gently poke a zucchini slice to test.
  10. Allow to cool, slice, and serve.

P.S. When I saw the Slice it Up recipe contest from OXO, I knew I had to enter. I love my OXO tools – for this recipe I’d use my mandoline (actually, I think my parents bought it for my husband, but I’ve taken it over), and my cheese grater.  I’m also totally enamored with my OXO vegetable peeler. I’m not just saying this for a contest, I really do love these tools!

Chicken and Waffles

Last March we stayed at the Venetian in Las Vegas and enjoyed two amazing brunches at Bouchon. One morning, Jeremy ordered the Chicken and Waffles, described on the menu as “roasted chicken, bacon and chive waffle, Tahitian vanilla bean butter, sauce chasseur.” We couldn’t stop talking about it, and after a Google search, I see we’re not alone.

Today I made us Bouchon-inspired chicken and waffles for brunch.  This Chicken and Waffles recipe from The Cookworks was a good basis, but I made a few changes.

For the waffles, I added minced chives and three slices of finely diced crispy bacon to the batter (also, I substituted milk with a squeeze of lemon juice for the buttermilk, simply because I didn’t have any).  Instead of skin-on chicken breast, I used moderately sized leg quarters. Last, I omitted the dijon cream sauce and instead emulated Bouchon’s menu with vanilla butter and something like a sauce Chausseur (I didn’t go crazy with ingredients here – I essentially made a gravy from rich chicken stock with some shallots and wine).

Dreaming of Bouchon

I’d rather eat the Bouchon version, but when I’m over 2000 miles away, this is a pretty good brunch. Next time I make it, I’ll omit the sugar in the waffle recipe. The Bouchon version uses sourdough, so maybe I’ll try a yeast dough as a base…well, before “next time” we have to eat our way through the 10 leftover waffles in the freezer. Not that I’m complaining.

Chocolate Peanut Butter Granola

As I mentioned in my last post, I like experimenting with granola ingredients. My favorite lately has been chocolate and peanut butter – even more addictive than the classic honey granola I posted last time, and a great homemade gift for the holidays. You may want to adjust the sugar and salt depending on the type of peanut butter you use. I prefer Teddie Natural Chunky peanut butter, which is unsweetened but salted.

Recipe: Chocolate Peanut Butter Granola

Ingredients

Chocolate Peanut Butter Granola

  • 2 c oats (not quick)
  • 1/2 tsp salt
  • 1/4 c cocoa powder
  • 1/2 c salted peanuts
  • 1/3 c canola oil (or other neutral oil)
  • 1/3 c peanut butter
  • 1/3 c honey
  • 1/4 c brown sugar, packed
  • 1 tsp vanilla extract

Instructions

  1. Preheat oven to 350.
  2. In a large bowl, toss oats, salt, cocoa powder and peanuts.
  3. In a saucepan, heat oil, peanut butter, honey, brown sugar, stirring occasionally, until the sugar has dissolved and the mixture bubbles a bit. Remove from heat and stir in vanilla.
  4. Pour liquid ingredients into the oat mixture and stir until the oats are evenly coated.
  5. Spread oats onto a nonstick cookie sheet. Bake for 10 minutes, then remove and gently toss the granola (if you want chunkier granola, just run a spatula under the granola and gently rearrange). Turn off the oven and put the granola back in for up to an hour to dry, tossing once more along the way.
  6. When granola is cool, store in an airtight container.
  7. Now the hardest part: try not to eat it all.

Number of servings (yield): 12


Best Granola Recipe

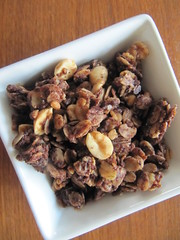
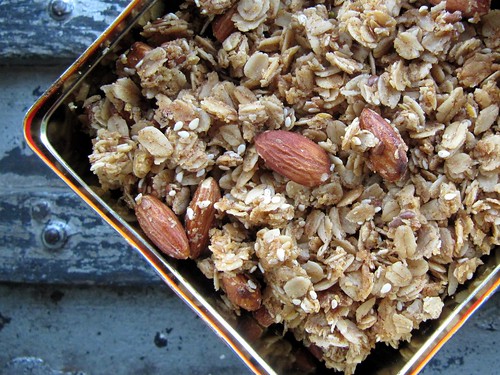
Making your own granola is easy and delicious. Addictively delicious. I can’t tell you how long the shelf life is because we eat it so quickly, especially when there’s a batch of homemade yogurt in the fridge.

Here’s my basic recipe, adapted from others I found.  After the recipe, I’ll give you my favorite add-ins.

1. Preheat the oven to 350.

2. Mix in a large bowl:

  • 3 cups rolled oats (NOT quick)
  • 1 tbsp cinnamon
  • 1 tsp salt
  • 1/2 cup nuts (I use almonds)

3. Heat in a small saucepan, stirring a few times, until the sugar dissolves and the  mixture starts bubbling:

  • 1/2 cup honey
  • 2-3 tbsp brown sugar
  • 1/4 cup neutral oil, such as canola oil
  • 1/4 cup water or juice (I like orange juice)

4. Once heated, stir in:

  • 1 tsp vanilla extract

5. Now pour the hot honey mixture into the oats and stir – make sure to stir all the way down to the bottom so all the oats get coated.  Spread on a non-stick or sprayed cookie sheet and place in the middle or top of the oven for 7 minutes.

6. Remove from the oven, stir, turn the heat down to 225 and bake for 30 more minutes, checking once in a while to make sure it’s not burning (or turn off the oven and leave in for an hour or more).

That’s it!

Homemade Granola

Variations:

Optional / swappable add-ins to the oat mix in step 2. You will probably want at least some nuts, but don’t feel like you need this long list of ingredients, you don’t!

  • 1/4 cup pumpkin seeds
  • 1/4 cup sesame seeds
  • 1/4 cup flax seeds (for healthy granola)
  • 1/4 cup wheat germ (for healthy granola)

Optional flavoring in step 4: almond extract, or why not orange?

Baking method: Depending on your ingredients, your baking time might vary. To test, I put a tiny bit in a dish and cool to see if it’s crunchy enough. You want your granola to be dry.  I’ve experimented with a lot of baking methods, sometimes if I don’t have time to watch it, I will bake for an hour at a lower temperature, or if I notice it’s not dry enough after baking, I’ll leave it in a warm but turned-off oven for an hour or so.  You can also bake it at a higher temperature for a shorter time, but you risk burning if you tend to multitask like me.

Type of Granola: If you want a healthier, less sweet granola, you can use more oats (4 cups instead of 3).  If you want a sweeter granola that holds together in big chunks, decrease the oats relative to the other ingredients.

Three Days of Salmon

After a fishing trip to Alaska last year (which I still need to blog about), we have some large pieces of salmon in the freezer. As someone who rarely cooked fish before, this has given me a wonderful opportunity to try new recipes and cooking techniques.

The large pieces sometimes mean several days of salmon.  Crafting a new meal out of leftovers is a creative exercise of which I’m very fond!  Here’s how I got three delicious meals out of one generous piece of salmon.

Day 1
Dinner: White wine-poached salmon topped with Pungent Parsley and Caper Sauce.  Green and yellow beans almondine.

Salmon SandwichDay 2
Lunch: Salmon sandwiches on 7 Stars Olive Bread spread with leftover Parsley and Caper sauce.

Day 3
Brunch:  Salmon cake benedict on 7 Stars Olive Bread with bearnaise sauce.  The leftover salmon and sauce made 5 salmon cakes when mixed with some onion, egg, old bread, and spices.

Sometimes, leftovers can be quite luxurious.

Pictured above: A salmon sandwich I made on olive bread – albiet a different one

Healthy Rye Berry Salad

I’m always on the lookout for easy summer lunches that transport well and don’t need to be heated.  This salad was imagined to use up some odds and ends.  I didn’t have high expectations but it came out so well, with pleasing textures and flavors.

This is my first time cooking with tempeh, and I’m honestly unsure what motivated me to buy it.  I had my doubts when I tried a piece raw – it tasted horrible!  But marinated and fried, it adds a good flavor and some protein to the salad.

Most of the other ingredients came from Rhode Island growers: the rye berries from Schartner Farms, the broccoli and garlic scapes from Pak Express.  The broccoli was so good that I ate most of the bag instead of putting it in the salad…even the stems were tender.

Hippie Salad

Ingredients

  • 1 package tempeh (I used an 8oz package of LightLife 3 grain)
  • 1 cup dried rye berries
  • a handful garlic scapes (scallions would work too)
  • 1/2 head broccoli (I also used the leaves)
  • orange juice
  • soy sauce
  • olive oil
  • cider vinegar

Directions

  1. Chop the tempeh into 1/2 in cubes and marinate in a mixture of soy sauce and orange juice, just enough to cover.  I used about 2 parts OJ to 1 part soy sauce.
  2. Prepare the rye berries: rinse with cool water and drain.  Bring 2.5 cups water to a boil, add rye berries, turn down the heat and simmer for at least 30 minutes.  If the rye berries are tender but with a bit of chewiness, they’re done.
  3. While the rye berries are cooking, chop the garlic scapes into small (1/8 in) rounds and the broccoli into 1/4 in pieces (or larger if you’d prefer).
  4. In a large bowl, prepare about a half cup of vinaigrette with some cider vinegar, olive oil, and pepper to taste.  It can be a bit on the sharp/sour side because we will add some sweetness – and saltiness – later.
  5. When the rye berries are finished cooking, drain and toss with the vinaigrette, broccoli and scapes.  The warm rye berries will soak up the dressing nicely.
  6. Drain the tempeh, reserving the marinade.  Fry in a skillet with a bit of olive oil, browning on all sides, about 5 minutes.  Pour the reserved marinade into the skillet, allowing it to cook down by about half.   If you used a lot of soy sauce, you might not want to use all the marinade so your salad does not end up too salty.  Mix the tempeh and cooked marinade into your salad, and season to taste if necessary.

Grilled Oysters

I love raw oysters, so I was skeptical the first time I heard of grilled oysters. Then I tried them at the Acme Oyster House in New Orleans, and I was more than willing to change my mind.

Broiled Oysters

Last weekend, we tried grilling our own, following Emeril’s recipe. The oysters are shucked, topped with a compound butter (with garlic, parsley, chives, lemon juice, cayenne, hot sauce), and grilled (we have a special rack to make sure they don’t tilt and lose those delicious juices, which are divine when soaked up with some crusty bread). They were almost perfect – next time we will add an extra sprinkling of Parmesan for that crispy texture.

Grilled Oysters

As J was shucking the oysters he made an interesting discovery – an Oyster Crab! They’re tiny (1/2″ or less) crabs that live inside oysters. I did exactly what you’d expect me to do: I took a picture of it, Googled it, then fried and ate it.